
Are you looking into how you can record your screen on Windows 10? In this guide, we’ve listed and detailed four simple methods that you can use to record your computer’s display.
W hether it’s for business, instructional, or entertainment purposes (such as gaming) there are many reasons why you’d want to record your PC’s screen. Whether you’re looking to get into creating gaming-related video content (whether on Twitch or on YouTube), or you want to make intructional how-to videos, you’re going to need to know how to record your computer’s screen.
Fortunately, there are a ton of different ways that you can accomplish recording the content on your computer’s display. In this guide, we’ll go over four different methods you can use to capture video from your computer so that you can use it to either stream live to your followers, or upload it as video content on a site like YouTube.
So, if you need help recording your PC’s screen, check out the options you have below:
One of the great features of Microsoft Windows 10 is that it features many programs already included with the operating system. The good news is that Windows 10 has its own built-in screen recorder so that you can record games (or anything else).
The not-so-good news is that it can be a little tricky to find. In order to locate it, you’ll need to open the pre-installed Xbox app. Click on the Windows Start button, go to the search box, and type in Xbox to find it. Next, hold down [Windows]+[G] on your keyboard. When prompted, click on the ‘Yes, this is a game’ button.

To start recording, click on the ‘Start recording’ button or hold down [Windows]+[Alt]+[R]. You can click ‘Stop recording’ or use same keyboard shortcut when you’re done. Recorded videos will be saved in your Videos/Capture folder in MP4 format.
To customize the recorder’s settings, log into the Xbox app and access the Game DVR options. You can’t choose a different destination folder for recordings, but you can pick a quality setting, decide whether or not to record audio, and set a maximum clip length.
*NOTE: One downside of the Windows 10 Game Bar is that, not all Windows 10 devices are able to record your screen with the Game Bar. In order to meet the requirements for using the Windows Game Bar, you’ll need a GPU that supports one of the following encoders:
Along with Windows Game Bar, there are also plenty of third party applications that will allow you to record your PC’s screen. Some third party options include, Open Broadcaster Software and BB Flashback. Both of these are free to download. Since they are free, you are pretty much beholden to the community of users for support. However, these programs have large enough communities of support such that they are viable options.

To use Open Broadcaster Software, select the settings you desire for video capture and video output. Since this software uses Scenes and Sources, you will need to open a new Scene and select a Source (e.g. video) for that Scene. Click Ok on the next two pop up windows that appear on your screen. Next, go to the Settings and click on the Output tab. Make sure that you are aware of your file destination for your recordings. From there, you are able to click Start Recording and Stop Recording as needed.
Should you opt for BB Flashback, the procedure is different and even a little more straightforward. By choosing to record your screen, the program lets you choose whether you want to record the entire screen or just an active window, or some specific region you have chosen. You will then need to choose an audio source via the check boxes on the screen. Once you have satisfied those requirements, you can click the Record button at the bottom of the window to start and stop recording. Now, if you want to take advantage of advanced features, you will need to purchase the Pro version.
If you have an NVIDIA graphics card in your computer, then you can use NVIDIA’s built-in screen capture feature, ShadowPlay (which can be run through NVIDIA’s GeForce Experience software). If you’re unsure on whether or not you have an NVIDIA GPU, check our guide on How to Check Your Computer’s Specs for a step-by-step process on how to find out what hardware you have in your computer.
If you’ve confirmed that you have an NVIDIA GPU, you’ll need to download NVIDIA’s GeForce Experience software (if you don’t have it already). Once you have the GeForce Experience software downloaded, you’ll need to log into it with your NVIDIA account.
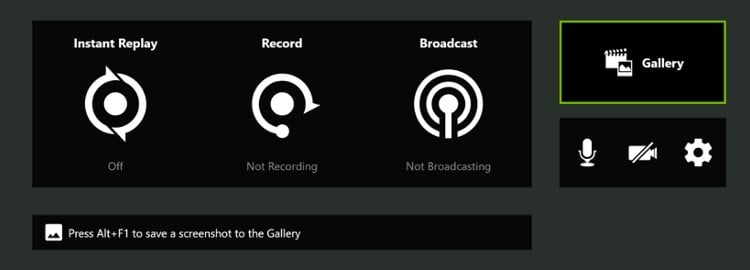
And, from there, you’ll want to click on the gear icon (settings) next to your profile name in the top right-hand corner, scroll down until you see ‘In-Game Overlay’ and make sure that the ‘On’ slider is switched to the left (making it green).
From there, recording is as simple as using the hotkey [ALT] + [F9] to both start and end your recording. All of your recordings will be saved in your user’s ‘Videos’ folder.
Not surprisingly, AMD also has a built-in screen capture feature on their newer graphics cards called Radeon ReLive.

In order to use Radeon ReLive, you must first make sure it is enabled from within Radeon Settings. To do this, open Radeon Settings by right clicking on your Desktop and then selecting AMD Radeon Settings. Once this has been enabled, you can customize the program to the hotkeys you want to start and stop your recordings.
And, like NVIDIA’s GeForce Experience, video captures from AMD ReLive will be stored in your user’s ‘Videos’ folder.
These are just a few of the options available to record a PC screen for the purposes of recording or streaming video. While there are other options available, these are currently the most popular options. Though this is not by any means intended to be an all-inclusive list of options, it is meant to give you a reference for getting started more quickly.

Hey, I’m Brent. I’ve been building PCs and writing about building PCs for a long time. Through TechGuided.com, I've helped thousands of people learn how to build their own computers. I’m an avid gamer and tech enthusiast, too. On YouTube, I build PCs, review laptops, components, and peripherals, and hold giveaways.
Read Comments »


